ECR Connection
1. Activate the ECR terminal device
1.1 Open and log in to the Wonder App, and switch to the relevant business.
1.2 Start the ECR terminal device, a QR code associated with the business will be presented on the device's screen.
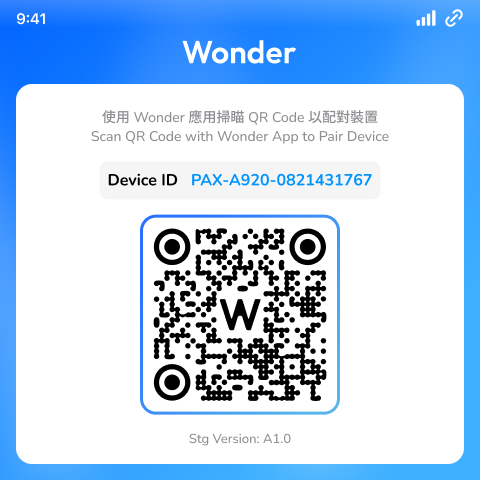
1.3 Bind the ECR terminal device with the business using the Wonder App's barcode scanner.
1.4 Once the binding is successful, the device application will automatically redirect you to the device pairing page.

{
  "deviceId":"NEXGO-N62-N620W318000",
  "ip":"172.16.91.29",
  "pairCode":"672633",
  "port":8443,
  "businessId":"411d6207-1470-4d35-a557-54852463844d"
}
2. ECR terminal device pairing
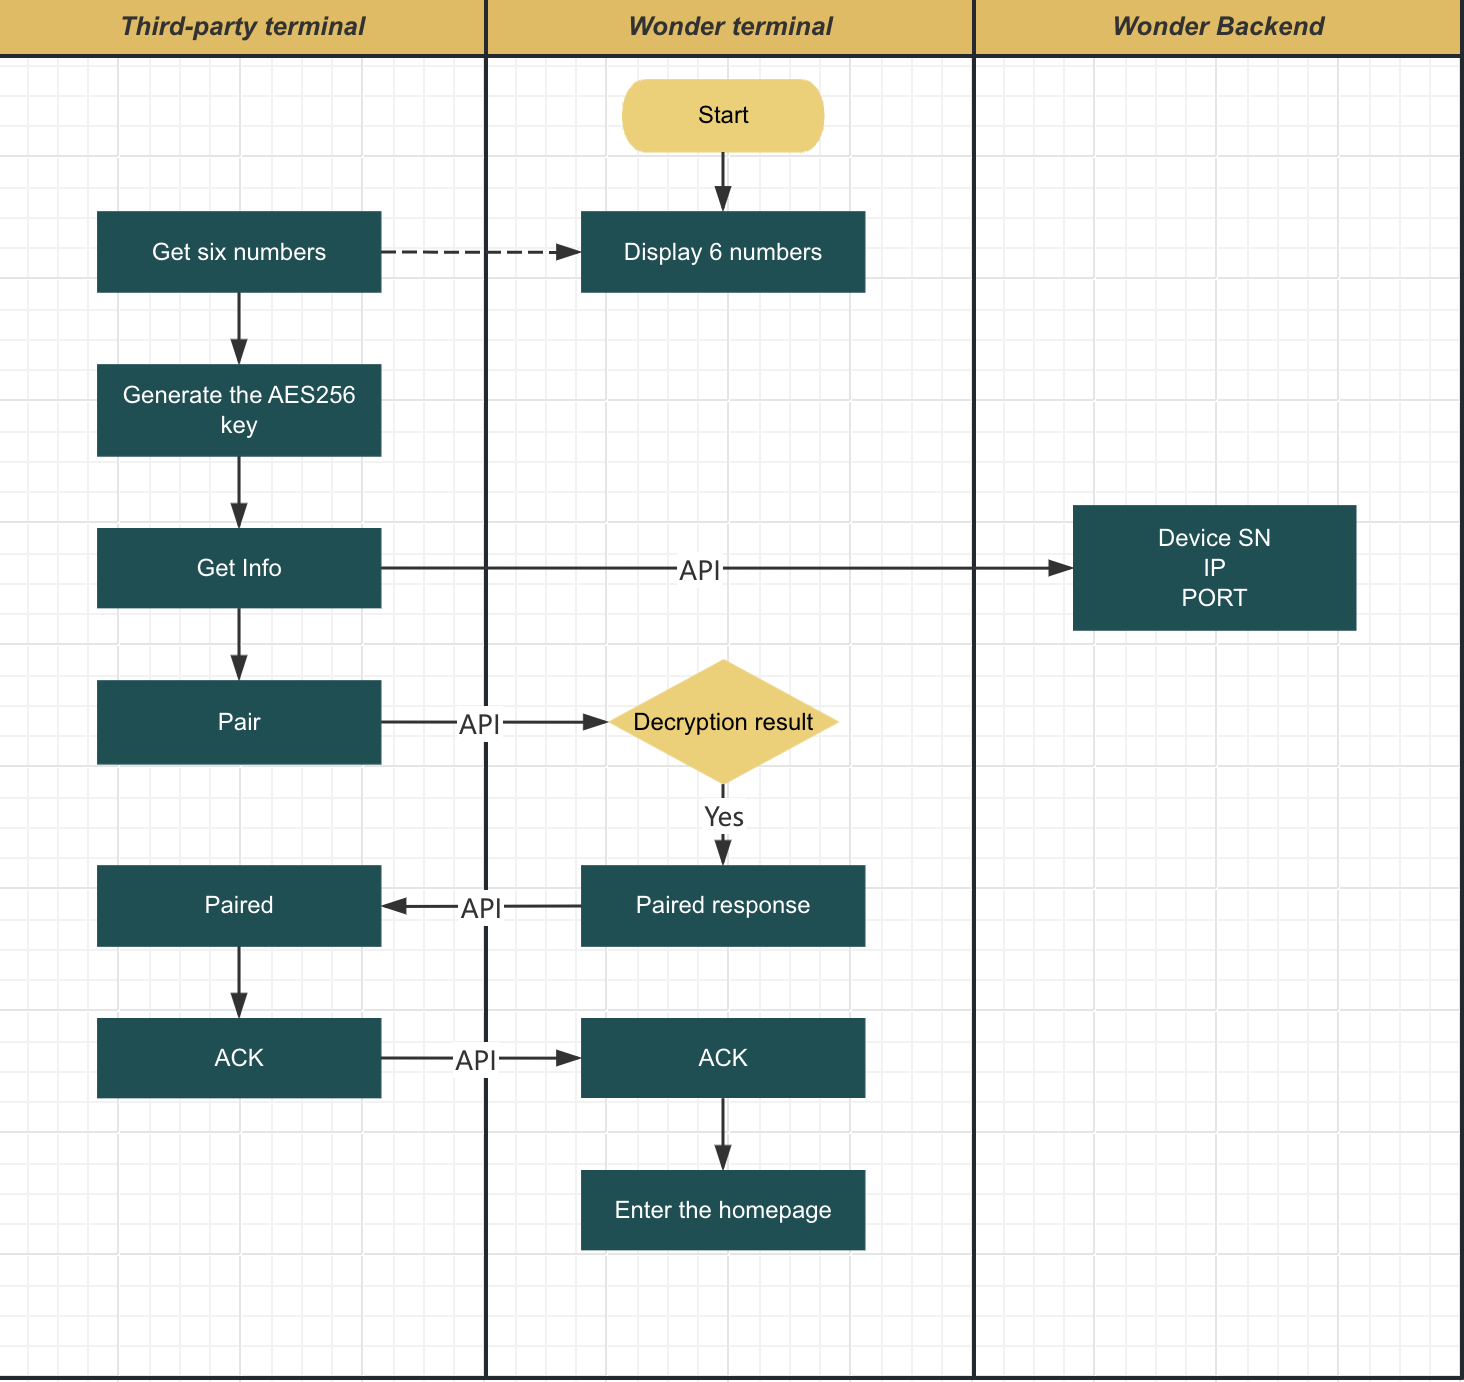
2.1 Via Cloud
-
Obtain a six-digit terminal device pairing code.
-
Enter the pairing code into the customer's pairing page, which is similar to the following flow:
-
Generate an AES256 Key using the pairing code
-
Use the ECR terminal Device synchronization interface to obtain the Device SN of the ECR terminal device
-
After obtaining the Device SN, pair the device using the pairing and confirmation pairing interfaces
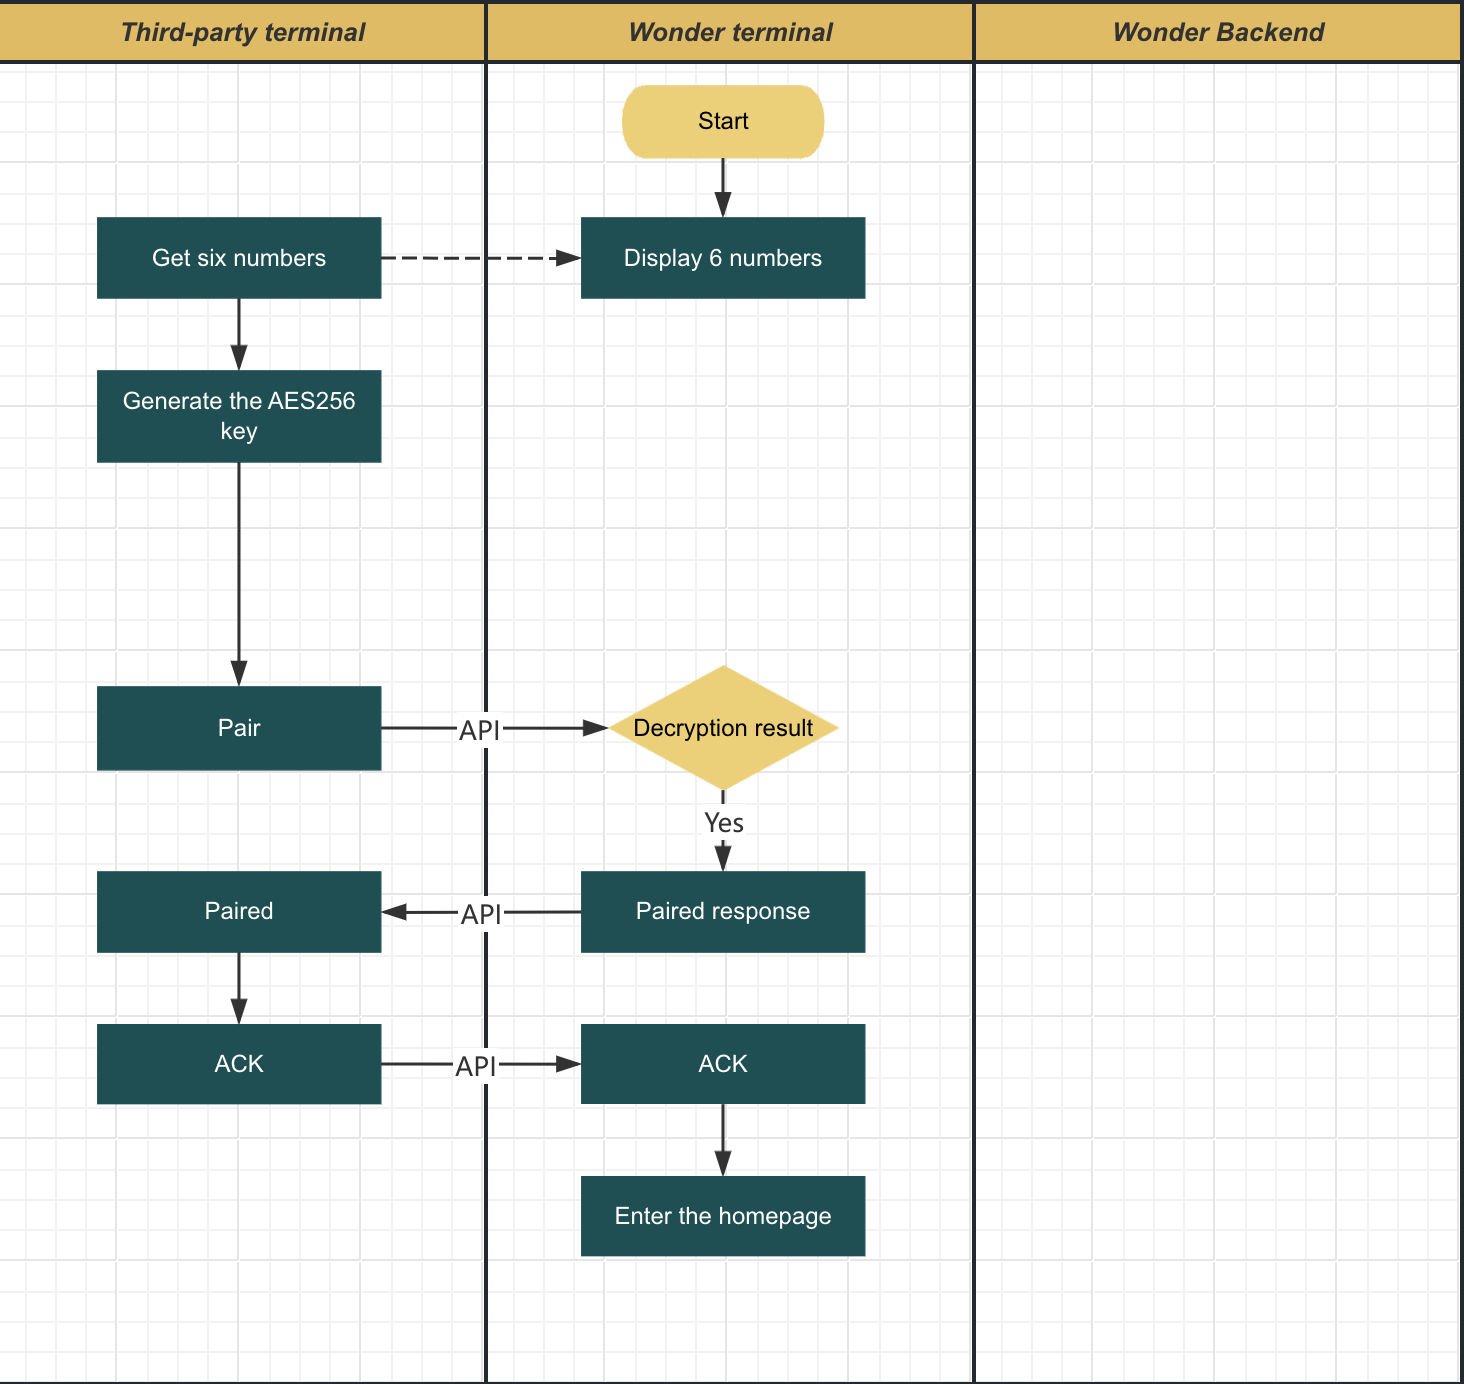
2.2 Via RS232
-
Obtain a six-digit terminal device pairing code
-
Enter the Pairing Code into the Customer's Pairing Page, which is similar to the following flow:
-
Generate an AES256 Key using the pairing code
-
After obtaining the device SN, pair the device using the pairing and confirmation pairing interfaces.
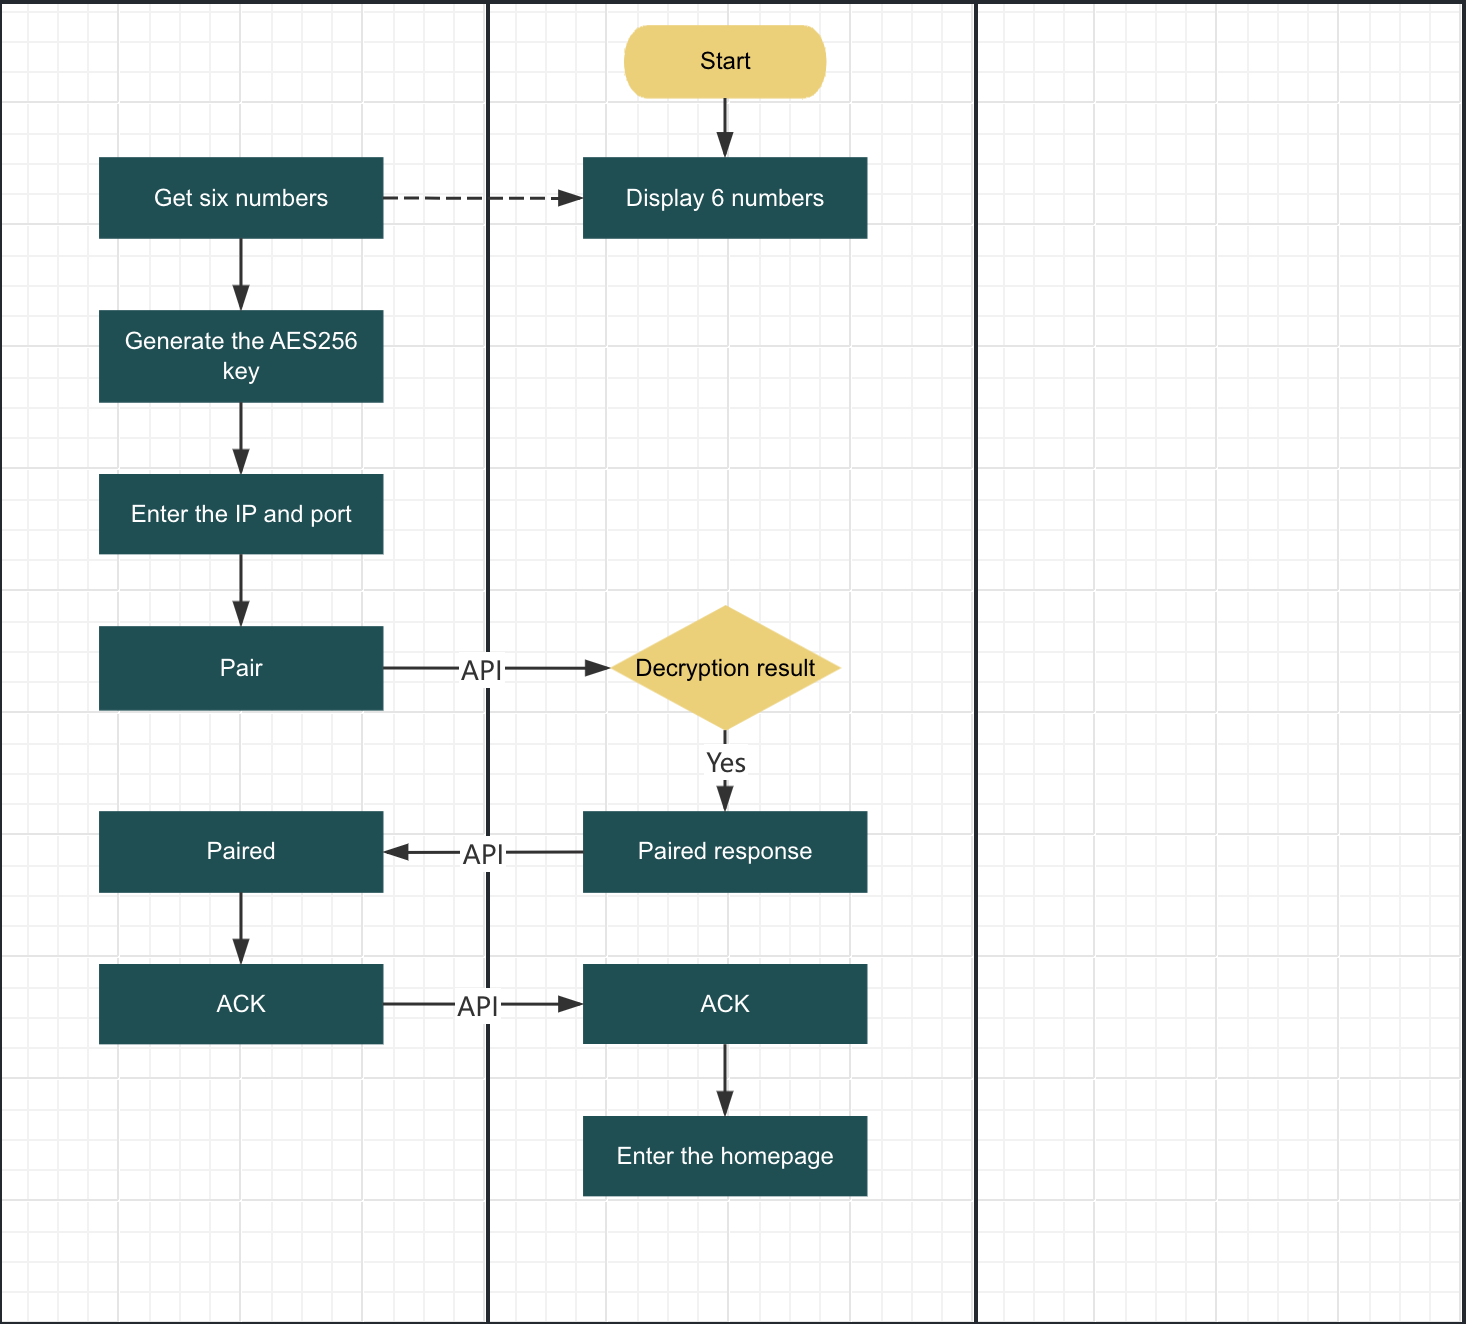
2.3 Via Local Area Network
-
Obtain a six-digit terminal device pairing code
-
Enter the pairing code into the customer's pairing page, which is similar to the following flow:
-
Generate an AES256 Key using the pairing code
-
Enter the IP address and port
-
After obtaining the device SN, pair the device using the pairing and confirmation pairing interfaces.
3. Interface Protocol Specification
3.1 Cloud Interface Protocol
All instructions communicate using the following interface addresses
URL(Staging): https://gateway-stg.wonder.today/svc/payment/public/api/v1/openapi/terminal/async
URL(Production): https://gateway.wonder.today/svc/payment/public/api/v1/openapi/terminal/async
1. Request header
| Variable | Type | Required | Description |
|---|---|---|---|
| x-p-business-id | String | Y | The current business ID, Specify the ECR device to receive orders for a certain Business |
| x-device-sn | String | Y | The serial number of the ecr terminal payment device |
| x-request-id | String | Y | Every time communication takes place, it is crucial to ensure that the Request ID is a unique UUID. |
2. Request body
| Variable | Type | Required | Description |
|---|---|---|---|
| version | String | Y | Current communication protocol version number |
| action | enum | Y | Actions: Pair, DeviceInfo, Sale, ... |
| data | String | Y | Encrypted data, It is necessary to distinguish the encryption keys of this data: pinCode1 and pinCode2 |
3. Response body
| Variable | Type | Required | Description |
|---|---|---|---|
| code | Number | Y | Current communication protocol version number |
| message | String | Y | Actions: Pair, DeviceInfo, Sale, ... |
| data | Object | Y | This data object is an ECR response data structure |
| data.version | String | Y | Please refer to the version description of the ECR response data structure |
| data.action | enum | Y | Please refer to the action description of the ECR response data structure |
| data.data | String | Y | Please refer to the data description of the ECR response data structure |
3.2 LAN Interface Protocol
1. Request url
http://<ECR terminal device IP address>:<ECR terminal device port>/v2/wonder/payment/ecr
2. Request body
Please refer to the Request data structure of the ECR interface protocol
3. Response body
Please refer to the Response data structure of the ECR interface protocol
3.3 Serial port RS232 protocol
Please refer to the communication protocol of the ECR serial port RS232
4. Other interface request protocols
4.1 Obtain device pairing information
After you obtain the 6-digit pair Pin Code(pinCode1) generated by the ECR terminal device, you generate the AES Key through a certain algorithm. Through this secret key, you can obtain the current configuration information of the ECR terminal Device, such as: Device SN, IP address, port.
URL(Staging): https://gateway-stg.wonder.today/svc/payment/public/api/v1/openapi/terminal/info
URL(Production): https://gateway.wonder.today/svc/payment/public/api/v1/openapi/terminal/info
Request body
Please refer to the Request body
Request "data.body" structure
| Variable | Type | Required | Description |
|---|---|---|---|
| businessID | UUID | Y | The current business ID, Specify the ECR device to receive orders for a certain Business |
Example:
/*
Pin Code: pinCode1
Encrypt the original data:
{
  "header": {
    "requestID": "2c7f32e1-b9e4-4b34-96cc-15c51289f69b",
    "clientDeviceSN": "126498561093",
    "timestamp": "2025-11-12T10:11:04+00:00"
  },
  "body": {
    "businessID": "ff467f02-5b69-45f3-81aa-bffcca55fe8f"
  }
}
*/

{
  "version": "2.0",
  "action": "ConnectionInfo",
  "data": "OSNqYo/FulKRnNOS1g2WtsjIw/Kvlv2yczj92Zom1NxWHXd74aJk84zoO7JwhwEwEwAwUN/VNP61lCxhCNWhWKC+rP0H4ApQ0jBJcqP9fGZ5TgL9Sxwz2/VdgR6QIk2yOgflnlINqLFSRoPi2fltDjc8DIqRuWtXnaFYar1TIzABcigSmHQY/av2FIbB+If7qBHada03AdlpV91dQgLCjbuYCQB47wUZt4v2mm3jqFUVDYfBdDi0hNKtErNEC1bex/iuD8AC/GZY1EP18Cg7G3C2RPsEonvcxcLrES3ydJ2n33RZVwro32C4NIzew0oX"
}
Response body
Please refer to the Response body
Response "data.body" structure
| Variable | Type | Required | Description |
|---|---|---|---|
| deviceSn | String | Y | The serial number of the payment device |
| ip | String | N | The IP address of the payment device |
| port | String | N | The port number of the payment device |
Example:
/*
Pin Code: pinCode1
Encrypt the original data:
{
  "header": {
    "responseID": "2c7f32e1-b9e4-4b34-96cc-15c51289f69b",
    "serverDeviceSN": "NEXGO-N96-1170270945",
    "timestamp": "2025-11-12T10:12:04+00:00"
  },
  "body": {
    "deviceSn": "NEXGO-N96-1170270945",
    "ip": "192.168.1.100",
    "port": "8858"
  }
}
*/

{
  "version": "2.0",
  "action": "DeviceInfo",
  "data": "FusVfCI3cJZMaiO0hvBaTxAK+kJ7oa5+SlXWFQCNOh2xmieB6TiVJWkBfcL3Ydo/b88+XGfIueLoHFWh1LPFYH/yY6v1AHyx7KeZnK8sQ33fRnmizzJqmZ8OzZww/pmpiw/X6aNeZoilWUbllQ2uBQDRmYNHeyNnu0mBT2osYrOnPJ8RYajHeBo4WcQlh8582o/HzJwMa1ZXK17LpD9+qYkQG3cd/y+/+XPJT+L/yVT3NFGHgEgc3YGxfEVAzGUBVx1X6DK58npB2jTCOd+ntttjZN9I5SK/J34uEXafvPxRHApRr/BqIYRfV4aKgNih4DRovheAFyhFDl7gmUS+wQ=="
}